Introduction: The Port Forwarding Wall
If you've ever tried to self-host a service—be it a personal website, a game server, a private cloud, or an API for a project—you've likely encountered the term "port forwarding." It's the standard method for making a service running on your local network accessible to the wider internet. You log into your router, find the port forwarding section, and map an external port to the internal IP address and port of your local machine.
But what happens when it just… doesn't work? You've followed every guide, triple-checked your settings, but your server remains invisible to the outside world. The frustrating culprit is often something you have no control over: Carrier-Grade NAT (CGNAT).
CGNAT is a technology used by many Internet Service Providers (ISPs) that fundamentally changes how your network connects to the internet, rendering traditional port forwarding impossible. You're behind a digital wall you can't configure.
This article is your guide to breaking through that wall. We'll dive deep into what CGNAT is, why it shatters the old rules of port forwarding, and most importantly, show you a simple, powerful, and open-source solution to bypass it. Using an open source tunneling tool called Tunnelmole, you can get a public URL for your local server in seconds, no router configuration or ISP calls required.
What is CGNAT and Why Does it Break Port Forwarding?
To understand CGNAT, we first need to travel back to the early days of the internet and talk about IP addresses.
The IPv4 Address Crisis
Every device connected directly to the internet needs a unique identifier, an IP (Internet Protocol) address. The original and still most widely used system is IPv4, which uses a 32-bit address format. This format allows for approximately 4.3 billion unique addresses (2^32).
In the 1980s, 4.3 billion addresses seemed like an inexhaustible supply. But with the explosion of personal computers, smartphones, servers, and now IoT devices, the world quickly ran out. The global pool of available IPv4 addresses was officially exhausted in 2011.
So, how does the internet keep growing? Through a clever workaround called Network Address Translation (NAT).
The Magic of "Normal" NAT
You're probably already using NAT without realizing it. Your home router is a NAT device. It has a single public IP address assigned to it by your ISP, the one that the rest of the internet sees. All the devices in your home (laptops, phones, smart TVs) each have a private IP address (usually in the 192.168.x.x or 10.0.x.x range).
When you access a website from your laptop, your router translates your laptop's private IP address into its own public IP address before sending the request to the internet. When the website responds, the router remembers which device made the original request and translates the address back, forwarding the response to your laptop. This allows many devices to share a single public IP address.
This is where port forwarding comes in. When an unsolicited request comes from the internet to your public IP (e.g., someone trying to access your self-hosted website), your router has no idea which of your internal devices to send it to. Port forwarding is you giving the router a specific instruction: "Any traffic that arrives on public port 8080 should be forwarded to the device at private IP 192.168.1.5 on its port 80."
You have control over your home router, so you can set up these rules.
The Problem with Carrier-Grade NAT (CGNAT)
As the internet grew, even giving each household a single public IPv4 address became unsustainable for ISPs. Their solution was to apply the same NAT concept on a much larger scale. This is Carrier-Grade NAT.
With CGNAT, you don't even get a real, unique public IP address for your home router. Instead, your ISP assigns your router a private IP address from their network. Your router, along with hundreds or thousands of other customers' routers, sits behind a massive NAT router at the ISP's data center. This ISP-level router is the only thing with a real public IP address.
This creates a situation known as "double NAT." Your devices are NAT'd by your home router, and then your home router is NAT'd again by the ISP's CGNAT router.

Now, the reason port forwarding fails becomes clear:
- You Can't Configure the ISP's Router: The port forwarding rule needs to be set on the device that has the public IP address. In a CGNAT setup, that's the ISP's equipment, which you have absolutely no access to.
- No Direct Path: Even if you could tell the ISP's router to forward a port, which customer would it go to? Hundreds of customers are sharing that same public IP. The system has no way of knowing the traffic is meant for you.
You are effectively firewalled off from the internet, unable to accept incoming connections. This is a huge problem for self-hosting, remote desktop access, online gaming, and many peer-to-peer applications.
How to Bypass CGNAT Port Forwarding with Tunnelmole
If you can't accept incoming connections, the solution is to make an outgoing one. This is the core principle behind tunneling tools like Tunnelmole.
A tunnel works by creating a persistent, secure connection from your local machine out to a publicly accessible server. This connection is initiated by you, so it easily passes through your router and your ISP's CGNAT equipment, as outbound connections are almost always allowed.
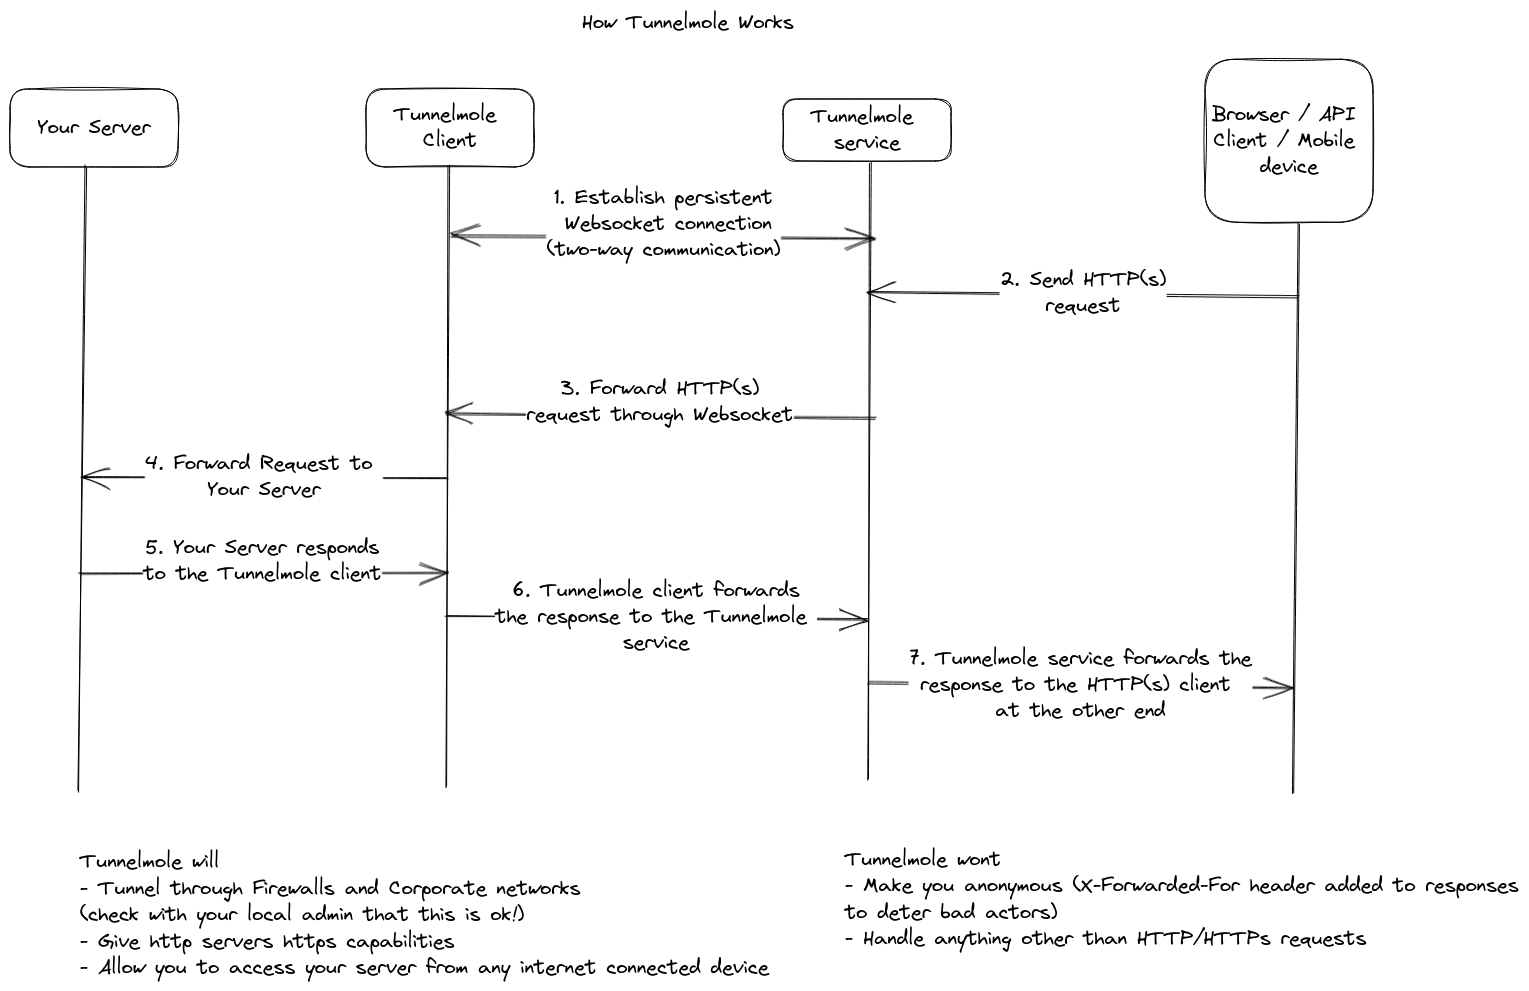
Here's the flow:
- You run the Tunnelmole client on your machine. It establishes a secure connection (a "tunnel") to the public Tunnelmole service host.
- The Tunnelmole service assigns you a unique public URL (e.g.,
https://random-name.tunnelmole.net). - When someone on the internet sends a request to your public URL, it hits the Tunnelmole service first.
- The Tunnelmole service takes that request and sends it down the pre-established tunnel to the client running on your machine.
- The Tunnelmole client then forwards the request to your local server (e.g., running on
localhost:3000).
The response from your server follows the exact same path in reverse.
This elegantly bypasses CGNAT entirely. You never need to configure port forwarding because you're not relying on incoming connections. Tunnelmole is an open-source and self-hostable tool that makes this process incredibly simple.
Step-by-Step Guide: Exposing a Local Server from Behind CGNAT
Let's walk through a practical example. We'll create a very simple web server using Node.js and Express, and then use Tunnelmole to expose it to the internet, bypassing CGNAT.
Step 1: Create a Simple Express.js Server
First, you'll need Node.js and NPM installed on your system. If you don't have them, you can download them from the official Node.js website.
Next, create a new folder for your project, navigate into it, and initialize a new Node.js project.
mkdir cgnat-test-server
cd cgnat-test-server
npm init -y
Now, install Express, a minimal and flexible Node.js web application framework.
npm install express
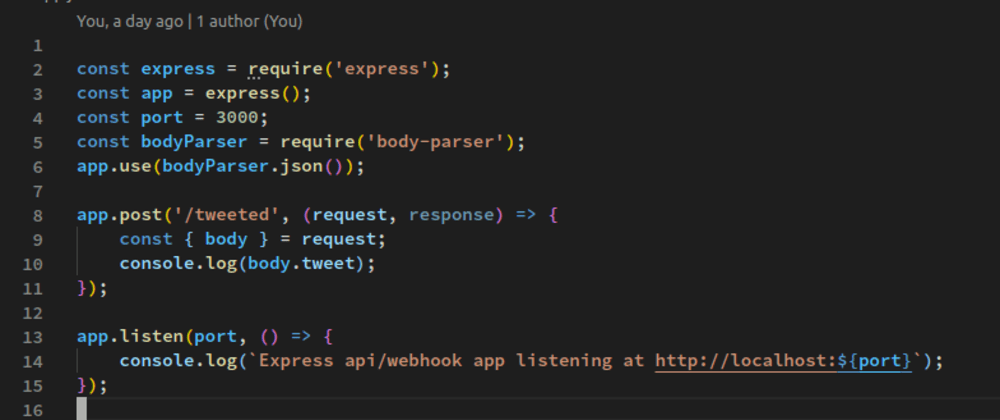
Create a file named server.js and add the following code:
// server.js
const express = require('express');
const app = express();
const port = 3000;

// A simple route for the root URL
app.get('/', (req, res) => {
    console.log('Request received at the root URL!');
    res.send('<h1>Hello from behind CGNAT!</h1><p>Your server is now publicly accessible thanks to Tunnelmole.</p>');
});

// A route that returns some JSON data
app.get('/api/info', (req, res) => {
    console.log('Request received for API info!');
    const data = {
        message: "This JSON response is served from a local machine.",
        cgnat_status: "Bypassed",
        timestamp: new Date().toISOString()
    };
    res.json(data);
});

// Start the server and listen on the specified port
app.listen(port, () => {
    console.log(`Simple Express server listening on http://localhost:${port}`);
    console.log('This server is only accessible on this machine... for now!');
});
This code creates a basic web server that listens on port 3000. It has two endpoints:
/: Responds with a simple HTML message./api/info: Responds with a JSON object.
Save the file and start your server from the terminal:
node server.js
You should see the output: Simple Express server listening on http://localhost:3000. You can open a web browser and navigate to http://localhost:3000 to confirm it's working locally. However, this URL is completely inaccessible to anyone else.
Step 2: Install Tunnelmole
Tunnelmole is a native NodeJS application and is very easy to install. There are a few different ways depending on your operating system.
Option A: Install with NPM (if you have Node.js)
This is the simplest method if you already have Node.js installed.
sudo npm install -g tunnelmole
Option B: Install Binary for Linux/Mac
If you don't have Node or want a self-contained binary, you can use this script.
curl -O https://install.tunnelmole.com/xD345/install && sudo bash install
Option C: Install Binary for Windows
- Download
tmole.exefrom the Tunnelmole downloads page. - Place it in a folder that is included in your system's
PATHenvironment variable.
Step 3: Get a Public URL
Leave your server.js running in its terminal. Open a new terminal window and run the following command:
tmole 3000
Tunnelmole will start, connect to the public service, and generate public URLs for your local server. The output will look something like this:
$ tmole 3000
Your Tunnelmole Public URLs are below and are accessible internet wide. Always use HTTPs for the best security

https://cqcu2t-ip-49-185-26-79.tunnelmole.net ⟶ http://localhost:3000
http://cqcu2t-ip-49-185-26-79.tunnelmole.net ⟶ http://localhost:3000
And that's it! Your local server is now publicly accessible.
Step 4: Test Your Public URL
Copy the https:// URL from the Tunnelmole output. You can now access your server from anywhere in the world using this URL.
- Open it in your browser: You'll see the "Hello from behind CGNAT!" message.
- Send it to a friend: They will be able to access your server from their computer.
- Access the API endpoint: Navigate to
YOUR_TUNNELMOLE_URL/api/infoand you'll see the JSON response. - Use a tool like
curl:
curl https://cqcu2t-ip-49-185-26-79.tunnelmole.net/api/info
# Expected output:
# {"message":"This JSON response is served from a local machine.","cgnat_status":"Bypassed","timestamp":"..."}
Check the terminal where your server.js is running. You will see the log messages for each request you make, proving that traffic is being tunneled directly to your local application. You've successfully bypassed CGNAT port forwarding restrictions.
Advanced Usage and Other Alternatives
Tunnelmole offers more than just random URLs.
Custom Subdomains
For a more permanent setup, you can use a custom subdomain. This requires a subscription to the Tunnelmole service or self-hosting your own Tunnelmole server. The command is simple:
tmole 3000 as my-cgnat-server.tunnelmole.net
Self-Hosting
One of the key advantages of Tunnelmole is that it's fully open source. If you have a VPS or any server with a public IP address, you can host the Tunnelmole Service yourself, giving you complete control over your tunneling infrastructure.
Conclusion
Being stuck behind CGNAT can feel like a major roadblock for any developer or hobbyist who wants to self-host services. It makes traditional port forwarding a non-starter, effectively cutting you off from accepting direct connections from the internet.
However, as we've demonstrated, this is a problem with a simple and elegant solution. By using an open-source tunneling tool like Tunnelmole, you can reverse the flow of connection, establishing an outbound tunnel that securely exposes your local server to the world via a public URL. In just a few commands, you can go from being firewalled by your ISP to sharing your project globally.
Whether you're developing webhooks, demoing a project for a client, or hosting a personal service, you no longer need to worry about the limitations of CGNAT.