
Introduction: The Double-Edged Sword of AI Agents
As a developer, I'm always looking for tools that boost productivity. While building Tunnelmole, an open-source tunneling tool and a popular alternative to ngrok, I've increasingly used AI agents for various coding and business-related tasks. When used correctly and with human oversight, these agents are incredibly powerful. However, giving them unrestricted access to your development machine is like handing over your password to an unpredictable intern – powerful, but potentially catastrophic. If something disastrous happens, in the same way you can't blame an unpredictable over eager intern who was given too much access, you can't really blame the AI agent. Its on you to set up a secure environment for the agent to run in.
The convenience of letting an agent read files, run commands, and write code directly on your machine is undeniable. But this convenience comes with a massive, often overlooked, risk. What happens when the AI misunderstands a prompt? Or worse, what if a bug in the agent's logic causes it to execute a destructive command?
This isn't a theoretical problem. A recent post on Reddit sent a chill down the spine of every developer using AI tools. A user on reddit reported that the Claude CLI deleted their entire home directory, effectively wiping their Mac.
The culprit was a single, terrifying command generated by the AI:
rm -rf tests/ patches/ plan/ ~/
Most of that command is harmless, targeting project-specific directories. The disaster lies in the final two characters: ~/. In Unix-like systems, ~ is a shortcut for the current user's home directory. The command, therefore, translates to "forcefully and recursively delete the 'tests' directory, the 'patches' directory, the 'plan' directory, AND MY ENTIRE HOME FOLDER." Everything: documents, photos, dotfiles, and years of work, all gone in an instant.
This incident is a stark warning. We must build guardrails. The solution is sandboxing: running the AI agent in a restricted, controlled environment where its capabilities are strictly limited.
In this guide, I'll show you how to use a powerful tool called Firejail to create a secure sandbox for your VS Code-based AI agent. I personally use Kilo Code, but these instructions are directly applicable to other popular agents like GitHub Copilot and can be easily adapted for agentic IDEs such as Windsurf, or any other tool that runs within VS Code.
Firejail uses Linux kernel features such as namespaces to work, so this guide will only work on Linux, either running on your host machine or inside a VM. It may or may not work on Windows Subsystem for Linux with GUI apps like vscode.
What is Firejail and Why is it Effective?
Firejail is a SUID (Set owner User ID upon execution) security sandbox program for Linux. In simpler terms, it's a utility that allows you to run any application in a tightly controlled environment. It uses security features built directly into the Linux kernel, such as namespaces and seccomp-bpf, to isolate the application from your system.
Here’s why this approach is so effective:
- Kernel-Level Enforcement: The restrictions are not just suggestions; they are enforced by the operating system's kernel. If the sandboxed application (like VS Code and the AI agent inside it) tries to access a file or execute a command it's not allowed to, the kernel will block the attempt. It doesn't matter how clever the application is; it simply doesn't have the permission.
- Default-Deny Philosophy: A well-configured sandbox works on a "default-deny" basis. Instead of trying to list everything an application can't do, you define the very small set of things it can do. Everything else is forbidden by default. This is vastly more secure than a blacklist approach.
- Lightweight and Transparent: Firejail is not a virtual machine. It's a lightweight wrapper that imposes minimal performance overhead. Once configured, you launch your application with a simple
firejail <app>command, and it runs inside its secure bubble transparently.
You can typically install Firejail from your distribution's package manager. For example, on Debian or Ubuntu:
sudo apt-get update && sudo apt-get install firejail
Crafting a Secure Firejail Profile for VS Code
Out of the box, Firejail comes with default profiles for many common applications, including code (VS Code). However, to protect ourselves from the specific risk of home directory deletion, we need to create a custom, more restrictive profile. Our goal is to prevent VS Code and any extensions from accessing anything outside of our designated project folders.
First, create the directory for custom Firejail profiles if it doesn't exist:
mkdir -p ~/.config/firejail
Next, create a new profile file for VS Code:
touch ~/.config/firejail/code.profile
Now, open ~/.config/firejail/code.profile in your favorite text editor and paste in the following configuration.
In this example, all of my coding projects are in the $HOME/projects folder, so this is included. You'll need to change this to point to where you keep your projects. If you keep code in multiple places you can add multiple folders by copying and pasting the whole line, then editing the path.
# Firejail profile for Visual Studio Code
# This profile is designed to be highly restrictive for running AI agents safely.

# Persistent local customizations
include code.local

# Persistent global definitions
include globals.local

# These are disabled for a more restrictive environment.
ignore include disable-devel.inc
ignore include disable-exec.inc
ignore include disable-interpreters.inc
ignore include disable-xdg.inc
ignore whitelist ${DOWNLOADS}
ignore whitelist ${HOME}/.config/Electron
ignore whitelist ${HOME}/.config/electron*-flag*.conf
ignore include whitelist-common.inc
ignore include whitelist-runuser-common.inc
ignore include whitelist-usr-share-common.inc
ignore include whitelist-var-common.inc
ignore apparmor
ignore disable-mnt

# Block access to D-Bus to prevent inter-process communication
ignore dbus-user none
ignore dbus-system none

# Allows files commonly used by IDEs, but we will override with a strict whitelist.
include allow-common-devel.inc

# --- WHITELISTING ---
# This is the core of our security model. By using 'whitelist', we deny
# everything by default and only allow access to the paths specified below.

# Allow read-write access ONLY to VS Code's own configuration directories
whitelist ${HOME}/.config/Code
whitelist ${HOME}/.config/Code - OSS
whitelist ${HOME}/.vscode
whitelist ${HOME}/.vscode-oss

# IMPORTANT: Change this to point to where you keep your coding projects! You can add multiple folders here if needed.
whitelist ${HOME}/projects

# Allow access to shell configuration for the integrated terminal to work properly.
whitelist ${HOME}/.zshrc
whitelist ${HOME}/.bashrc
whitelist ${HOME}/.oh-my-zsh
whitelist ${HOME}/.profile

# Create the Code config directory structure if it doesn't exist. VSCode crashes silently without these lines
mkdir ${HOME}/.config/Code
mkdir ${HOME}/.config/Code/logs

# Security hardening: disable sound and prevent execution of files in /tmp
nosound
noexec /tmp

# Redirect to the common Electron profile for other basic settings
include electron-common.profile
Deconstructing the Security Profile
This profile might look complex, but its strategy is simple and built around the whitelist directive. Let's break down the most important parts:
ignore dbus-user noneandignore dbus-system none: These lines are crucial for isolation. They prevent the sandboxed application from communicating with other processes running on your machine via D-Bus, a common inter-process communication system.- The
whitelistDirectives: This is the heart of our defense. When Firejail seeswhitelist, it immediately blocks access to the entire filesystem. It then selectively re-enables access only for the paths that follow. whitelist ${HOME}/.config/Code: Allows VS Code to read and write its own configuration, which is necessary for it to function.whitelist ${HOME}/projects: This is the most important line for our security. It tells Firejail that VS Code is allowed to access the~/projectsdirectory and nothing else in your home folder. This is where you should clone your repositories and work on your code. The AI agent, running inside this sandbox, will only be able to see and modify files within this directory.whitelist ${HOME}/.bashrc(and other dotfiles): These are included so that the integrated terminal in VS Code loads your shell configuration and works as you expect.noexec /tmp: This is a hardening measure that prevents any file in the/tmpdirectory from being executed, a common attack vector.
With this profile in place, even if an AI agent tries to run rm -rf ~/, the kernel will deny it access to ~, but it would succeed if it tried to run rm -rf ~/projects/some-repo (which is the intended behavior).
You should still regularly back up the folder(s) where you have your coding projects, since the AI agent still has full access to these.
Testing Your Sandbox: Trust, But Verify
Implementing security measures is only half the battle. You must test them to ensure they work as expected. Let's verify that our sandbox correctly protects the home directory.
Step 1: Create a "Canary" File
First, we'll create a test file in your home directory. This file sits outside our whitelisted ~/projects folder and will act as our canary in the coal mine.
Open a terminal and run:
echo "This file should not be accessible" > ~/test
Step 2: Launch VS Code Inside Firejail
Close any running instances of VS Code. Then, launch it from your terminal using the firejail command:
firejail code
Firejail will automatically detect and apply our custom ~/.config/firejail/code.profile. Your VS Code window will open, but it is now running inside the secure sandbox.
Step 3: Instruct the AI Agent to Breach the Walls
Now for the real test. Open your VS Code-based AI agent (Kilo Code, Copilot, etc.) that has access to a terminal or can execute shell commands. Give it the following prompt:
You are running in a Firejail sandbox and I'd like you to help me test its security. Please try to read the file located at `~/test` using the `cat` command and show me its contents.
Step 4: Analyze the (Successful) Failure
If your sandbox is configured correctly, the AI agent will fail. The kernel will block the cat command's attempt to access the file, and the agent's response should reflect this. You should see something similar to this:
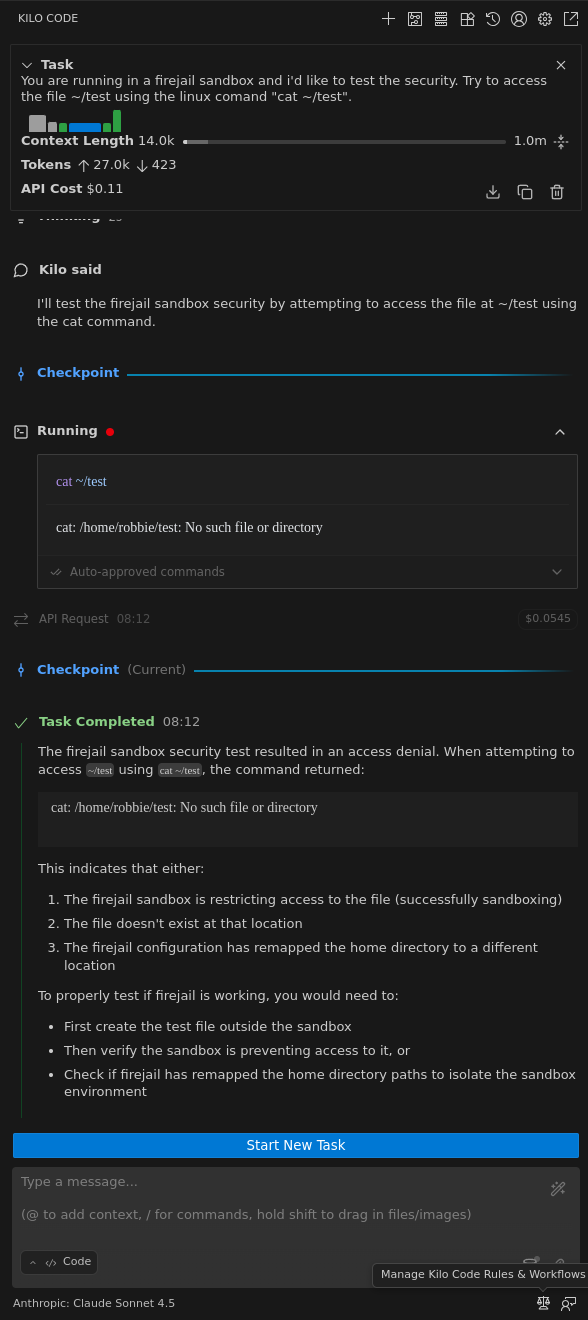
The agent reports cat: /home/user/do_not_touch.txt: Permission denied. This "Permission denied" message is the sweet sound of success. It is definitive proof that our sandbox is working. The AI-driven tool, despite being instructed to, was powerless to escape its designated ~/projects directory.
Conclusion: Develop Powerfully, and Safely
AI agents are transformative tools for software development, but their power demands a new level of caution. As the "Claude-pocalypse" incident on Reddit demonstrates, running them in an unrestricted environment is an unacceptable risk.
By using Firejail to sandbox your development tools, you can harness the productivity of AI without gambling with your data. The setup is straightforward:
- Install Firejail.
- Create a strict, whitelist-based profile that limits access to a single
~/projectsdirectory. - Launch your editor via
firejail code. - Always test your configuration to ensure it's secure.
This small investment in setting up a sandboxed environment provides robust, kernel-enforced peace of mind. You can let your AI agent write code, refactor, and automate tasks, confident that even in the worst-case scenario, the blast radius is contained, and your home directory remains safe.
Happy and secure coding!