
How to Expose Localhost to the Internet: A Developer's Guide
As a software developer, you frequently build and test applications on your local machine. Your development server runs on localhost (or 127.0.0.1), a loopback address that makes the service accessible only from your own computer. This setup is perfect for the initial stages of development.
However, the moment you need to share your work with the outside world, localhost is no longer sufficient. Whether you need to test webhooks from a third-party service, demonstrate a feature to a client, or test on a physical mobile device, you need a way to expose your localhost to the internet.
This guide will walk you through why you need to do this and how you can achieve it effortlessly using Tunnelmole, an open source tool that gives your local server a public, internet-accessible URL.
Why Expose Localhost to the Internet?
Running services on localhost is standard practice, but its private nature becomes a limitation in many common development scenarios. Here are several key reasons why you might need a public URL for your local server:
1. Testing Webhooks
Modern applications rely heavily on webhooks for real-time notifications from third-party services like Stripe, Shopify, Slack, or GitHub. These services need to send HTTP requests to a public endpoint on your server whenever an event occurs (e.g., a new payment, a new order, a new message). If your application is running on localhost, these services have no way to reach it. To test and debug webhooks end-to-end, you must expose your local development server to the internet.
2. Live Demonstrations and Collaboration
Imagine you're working on a new feature and want to show it to a product manager, a designer, or a client for quick feedback. Deploying your application to a staging server for every minor change is slow and inefficient. By exposing your localhost to the internet, you can generate a temporary public URL and share it with collaborators. They can access your work-in-progress directly from their browsers, providing instant feedback while the code is still running on your machine.
3. Real-Device Mobile Testing
While browser developer tools offer excellent emulators for mobile devices, they can't fully replicate the behavior of a real device. Testing on an actual smartphone or tablet is crucial for verifying touch gestures, performance, and responsive design accurately. With a public URL for your localhost, you can simply open that URL on any physical device connected to the internet to test your mobile web experience an a real device.
4. Cross-Browser and Cross-Device Testing
Sometimes, you need to test your application on a different machine, perhaps running a different operating system or browser that you don't have installed. Instead of setting up a complex local network or deploying your code, you can use a public URL to access your local server from any other computer, making cross-browser and cross-device testing straightforward.
5. Developing with HTTPS-Only Features
Certain modern web features, like Progressive Web App (PWA) service workers, Secure Cookies, and Web Push Notifications, require a secure HTTPS connection to function. While you can set up a self-signed certificate for localhost, it often comes with browser warnings and configuration headaches. A tunneling service like Tunnelmole can provide an instant, valid HTTPS URL, allowing you to develop and test these features without any complex setup.
How to Expose Your Localhost with Tunnelmole
Tunnelmole is a free and open-source tool designed to make exposing your local services simple and fast. It creates a secure tunnel from a public URL to the application running on your local machine.
Here's a step-by-step guide to get you started.
Step 1: Have a Local Server Running
First, ensure you have a web application or service running locally. For this example, let's assume you have a simple Node.js Express server running on port 3000.
If you don't have one, you can create a minimal NodeJS server with a file named server.js:
// server.js
const express = require('express');
const app = express();
const port = 3000;

app.get('/', (req, res) => {
  res.send('Hello from my local server!');
});

app.listen(port, () => {
  console.log(`Server listening at http://localhost:${port}`);
});
Install the dependency and run it:
npm install express
node server.js
Your server is now listening for requests at http://localhost:3000.
Step 2: Install Tunnelmole
Tunnelmole can be installed as a global NPM package if you have Node.js installed, or you can use a pre-compiled binary for your operating system.
Installation with NPM
If you have Node.js (version 16.10 or later) installed, you can install Tunnelmole with a single command:
sudo npm install -g tunnelmole
Installation for Linux, macOS, or WSL
For other systems, you can use the install script, which automatically detects your OS and installs the correct binary:
curl -O https://install.tunnelmole.com/xD345/install && sudo bash install
This script handles everything for you, making installation quick and easy.
Step 3: Expose Your Local Port
With your local server running and Tunnelmole installed, open a new terminal window. To expose your server running on port 3000, simply run:
tmole 3000
Tunnelmole will start and provide you with public URLs that forward traffic to your localhost:3000.
$ tmole 3000
Your Tunnelmole Public URLs are below and are accessible internet wide. Always use HTTPs for the best security

https://k1wxzc-ip-49-185-26-79.tunnelmole.net ⟶ http://localhost:3000
http://k1wxzc-ip-49-185-26-79.tunnelmole.net ⟶ http://localhost:3000
That's it! You now have a public HTTPS URL. You can share this URL with anyone, use it for webhook integrations, or access it from your mobile device. Any request sent to the Tunnelmole URL will be securely tunneled to your local application.
Using a Custom Subdomain
If you need a more predictable URL that doesn't change every time you start Tunnelmole, you can use a custom subdomain. This feature is available with a subscription or if you choose to self-host the service.
To use a custom subdomain, the command is:
tmole 8080 as my-cool-app.tunnelmole.net
This makes your local server available at https://my-cool-app.tunnelmole.net, which is much easier to remember and reuse for webhook configurations.
How Does Tunneling Work?
The concept behind Tunnelmole is straightforward but powerful. Here is a diagram illustrating the process:
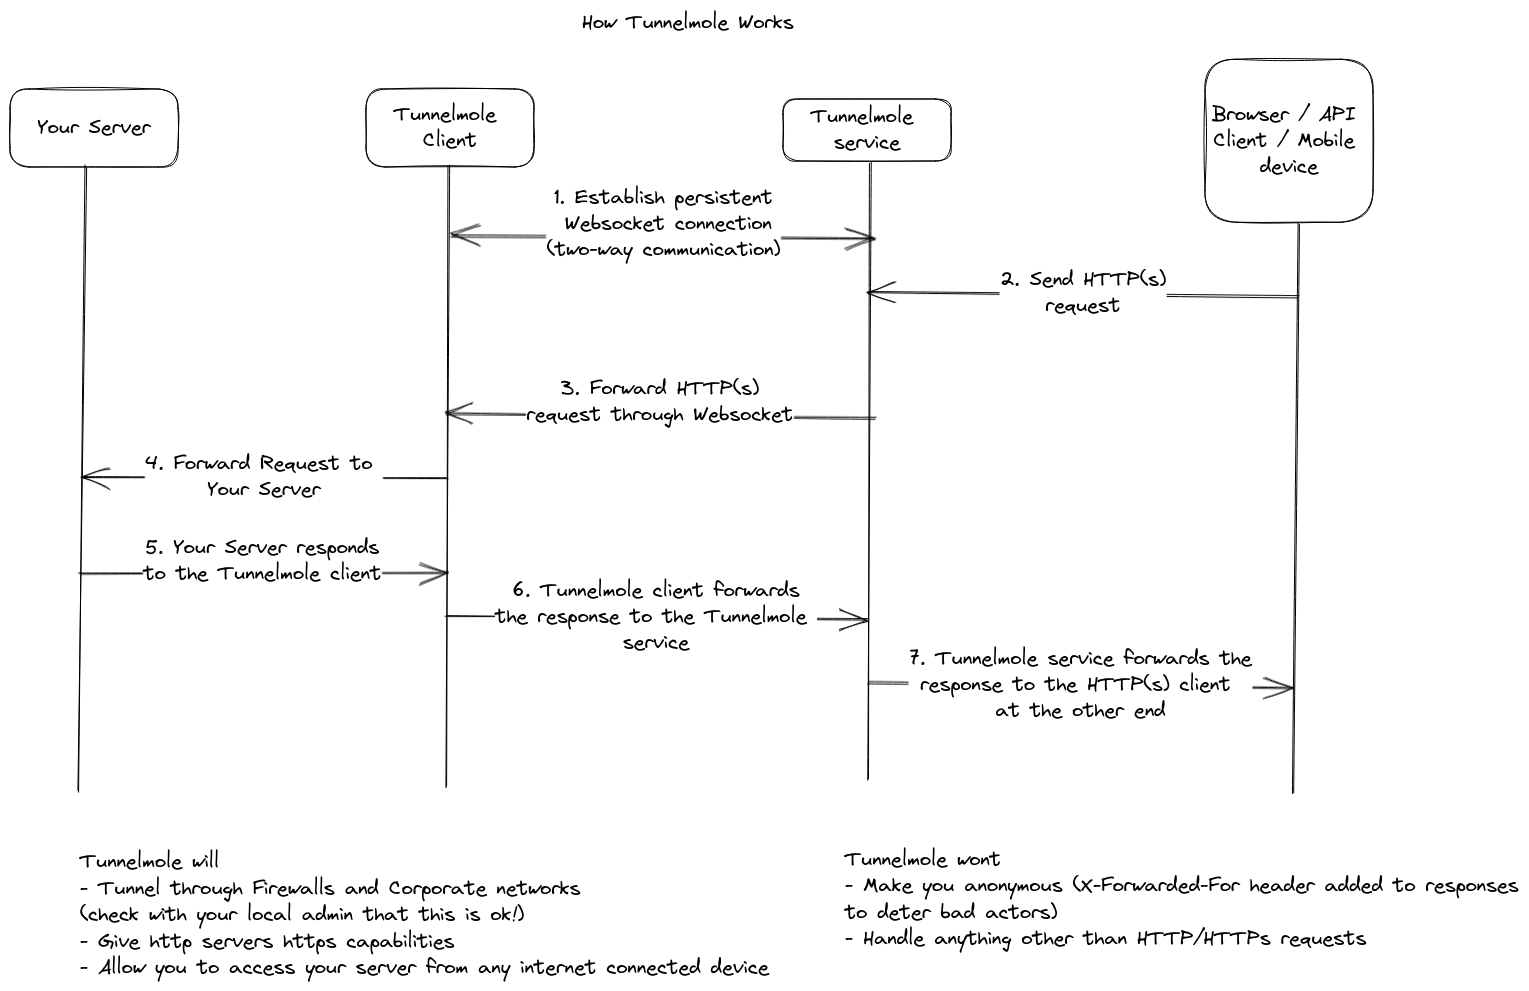
- Client Connection: When you run
tmole, the client application on your machine establishes a persistent, secure connection to the Tunnelmole cloud service. - Public URL Assignment: The Tunnelmole service assigns a unique public URL and listens for incoming HTTP requests at that address.
- Request Forwarding: When an external service or user sends a request to your public URL, the Tunnelmole service receives it.
- Tunneling to Localhost: The service then forwards this request through the established secure tunnel to the Tunnelmole client running on your computer.
- Local Server Response: The client sends the request to your local application (e.g., on
localhost:3000). Your application processes it and sends a response back to the client. - Response Tunneling: The client sends the response back through the tunnel to the service, which in turn delivers it to the original requester.
This entire process happens in milliseconds, creating a seamless link between the public internet and your private development environment.
Open Source and Self-Hosting
One of the standout features of Tunnelmole is that it's fully open source. Both the client and the server codebases are available on GitHub. This transparency offers several key advantages:
- Security and Trust: You can inspect the code to understand exactly what it does. There are no black boxes, giving you full confidence in the tool's security.
- Customization: If you have specific needs, you can fork the repository and modify the code to fit your requirements.
- Self-Hosting for Full Control: For maximum privacy, security, and control, you can host the Tunnelmole service on your own server. This is ideal for corporate environments with strict security policies or for developers who prefer to manage their own infrastructure. Self-hosting also allows you to use features like custom domains without a subscription.
Conclusion
The ability to expose localhost to the internet is an essential technique for the modern developer. It streamlines collaboration, simplifies webhook testing, and enables accurate real-device testing, saving you countless hours of deployment and configuration hassles.
Tools like Tunnelmole make this process incredibly simple, providing a secure, reliable, and fast way to get a public URL for any local service. Because it's open-source and self-hostable, it offers a level of flexibility and transparency that fits perfectly with the developer ethos.
The next time you find yourself stuck behind localhost, remember that a public URL is just one command away.